The secret to a Michelin-style dinner party isn’t better recipes; it’s adopting a professional chef’s system for managing flavour, time, and perception.
- Structure the meal’s “sensory arc” by progressing from delicate to robust flavours to avoid palate fatigue.
- Use precise portion control and visual tricks to make small, affordable plates feel luxurious and satisfying.
- De-risk your timeline by pre-plating cold courses and using techniques like sous vide to bypass the single-oven bottleneck.
Recommendation: Stop thinking about individual dishes and start choreographing the entire guest experience from the first bite to the last.
The ambition is admirable: to host a dinner party that feels less like a home meal and more like a culinary event. You envision a seamless flow of exquisite small plates, each a conversation starter, culminating in a memorable evening for your guests. Yet, the reality for the ambitious home cook is often a frantic ballet of overflowing pots, a desperate race against the clock, and the nagging fear of serving five courses that are either too much or too little. The dream of a sophisticated degustation menu quickly dissolves into kitchen chaos.
Most advice centres on finding the right recipes or simply “planning ahead.” But these are superficial fixes to a systemic problem. You can have the best recipes in the world, but if your flavour progression is wrong, you’ll overwhelm your guests’ palates by the third course. If your portioning is off, they’ll be uncomfortably full before the main event. And if you rely solely on a single domestic oven, your entire timeline is a house of cards waiting to collapse.
But what if the real key wasn’t in the recipes you choose, but in the system you use to design, prep, and execute the meal? The truth is, professional chefs don’t just cook; they are masters of logistics, psychology, and sensory science. They build a “flavour architecture” for the entire meal, they choreograph a timeline that works backwards from the moment of service, and they understand how to create a sense of abundance with minimal ingredients. This guide won’t give you a list of dishes. It will give you something far more valuable: the ex-Michelin chef’s framework for thinking about and executing a degustation menu, turning your ambition into an achievable, impressive reality.
This article will deconstruct the professional system you can apply in your own home. We’ll explore the architecture of flavour, the psychology of portioning, the choreography of prep, and the visual techniques that elevate simple ingredients into a fine-dining experience.
Summary: The Professional Framework for Home Degustation Menus
- How to Balance Flavour Profiles Across Successive Small Plates Without Overwhelming Palates
- The Portion Control Mistake That Leaves Dinner Guests Stuffed Before the Main Course
- Why Pre-Plating Cold Appetisers Saves Your Entire Evening Hosting Timeline?
- In What Exact Sequence Should You Prep 5 Dishes Using a Single Domestic Oven?
- Which Elevates Complex Seafood Starters Better Between Wine Pairings and Botanical Mocktails?
- How to Use Agar-Agar Successfully to Create Stable Fruit Caviars at Home
- How to Master the Negative Space Technique for Affordable Meat Cuts
- How to Elevate Budget Meals Using High-End Visual Culinary Presentation at Home
How to Balance Flavour Profiles Across Successive Small Plates Without Overwhelming Palates
The most common mistake in multi-course dining is not a lack of flavour, but an abundance of it, poorly sequenced. A home cook, eager to impress, might serve a punchy, garlic-heavy appetiser followed by a creamy, rich soup. While delicious individually, this sequence assaults the palate, leaving it fatigued and unable to appreciate the subtleties of later courses. The professional approach is to design a sensory arc, a deliberate progression of taste and texture that builds throughout the meal without causing burnout.
This concept is deeply rooted in culinary traditions like the Japanese Kaiseki, a multi-course meal that is a masterclass in flavour architecture. The meal begins with the most delicate tastes—a few slices of sashimi, a light vegetable broth—and gradually introduces more substantial and complex profiles, like tempura or grilled fish. This isn’t just about going from “light to heavy”; it’s about respecting the diner’s capacity to taste. Scientific research on the temporal order of tasting confirms this wisdom, showing how initial subtle flavours prime the palate for what’s to come.
The enemy here is “flavour fatigue.” Further research on flavor fatigue shows that repeated exposure to intense or layered flavours leads to desensitisation. Your guests literally stop tasting the full profile of the food. To combat this, think in contrasts and resets. After a rich, fatty course, introduce a dish with high acidity (like a citrus sorbet or a vinaigrette-dressed leaf) to cleanse the palate. Vary textures: follow a soft purée with something crisp. Your five courses should not be five separate sprints; they should be a single, elegantly paced journey.
Ultimately, a perfectly balanced menu leaves the guest feeling satisfied and stimulated, not exhausted. Each course should make them eager for the next, not wishing it was the last.
The Portion Control Mistake That Leaves Dinner Guests Stuffed Before the Main Course
In home entertaining, there’s a deeply ingrained belief that generosity is measured by the size of the portion. This is the single most destructive mindset when attempting a degustation menu. The goal of a five-course meal is not to stuff your guests; it is to provide them with five distinct, enjoyable experiences. Serving five “standard” sized portions is a guaranteed recipe for discomfort, waste, and an inability to enjoy the final, often most laborious, courses.
The psychology is clear: variety encourages consumption. In fact, according to Penn State research, people ate 27% more calories when offered a variety of items in large portions. Your five-course menu is a perfect storm for this phenomenon. The only way to counteract it is with rigorous, professional-grade portion control. You are not starving your guests; you are curating their appetite to last the entire experience.
So, what are the professional benchmarks? Think in ounces and bites, not in plate coverage.
- Amuse-bouche: This is a single, perfect bite. No more than 1-2 ounces total. Its purpose is to wake up the palate, not to fill the stomach.
- Appetizer/Soup: For a soup, 4-6 ounces (a small ladleful) is ample. For a solid appetizer, like scallops, two or three medium-sized pieces are the limit.
- Main Course: The peak of the meal, but still controlled. A 4-6 ounce cooked weight portion of protein (like duck breast or a piece of fish) is the industry standard. The accompanying elements should be proportional.
- Cheese/Dessert: Again, think in small, flavour-intense portions. A sliver of cheese, not a wedge. A few spoonfuls of dessert, not a full slice of cake.
This approach requires a mental shift. You are aiming for “perceived abundance”—making a small amount of food feel special and sufficient through beautiful presentation—rather than sheer volume.
The ultimate compliment is not “I’m so full I can’t move,” but “Every single course was the perfect amount.” That is the mark of a truly professional host.
Why Pre-Plating Cold Appetisers Saves Your Entire Evening Hosting Timeline?
The greatest source of stress for a home host is the final-hour rush. Juggling hot pans, trying to plate elegantly while guests are waiting, is where the best-laid plans crumble. The professional solution is to remove as many day-of variables as possible. The most powerful tool in your arsenal for this is the cold, pre-plated first course. This isn’t just about getting ahead; it’s about strategically creating a buffer of calm at the most critical moment: the beginning of the meal.
Imagine your guests have arrived. Instead of being chained to the stove, you are with them, drink in hand. When it’s time for the first course, you simply walk to the refrigerator, pull out five perfectly composed, chilled plates, and serve. This single act of “timeline choreography” does three things: it impresses your guests with your organization, it ensures the first course is served at its optimal temperature, and most importantly, it buys you undistracted time to manage the first of your hot courses.
Case Study: The 10-Course Home Tasting Menu
A home chef documented their successful execution of an ambitious 10-course menu. The key to their success was a ruthless approach to prep. All cold courses were fully prepared and plated in advance, stored in the fridge. The first course, a chilled radish and herb cream dish, was served with zero last-minute effort. This allowed the host to be fully present with guests while the next hot courses were held at perfect serving temperature in a sous-vide water bath, completely freeing up the oven and stovetop for later dishes.
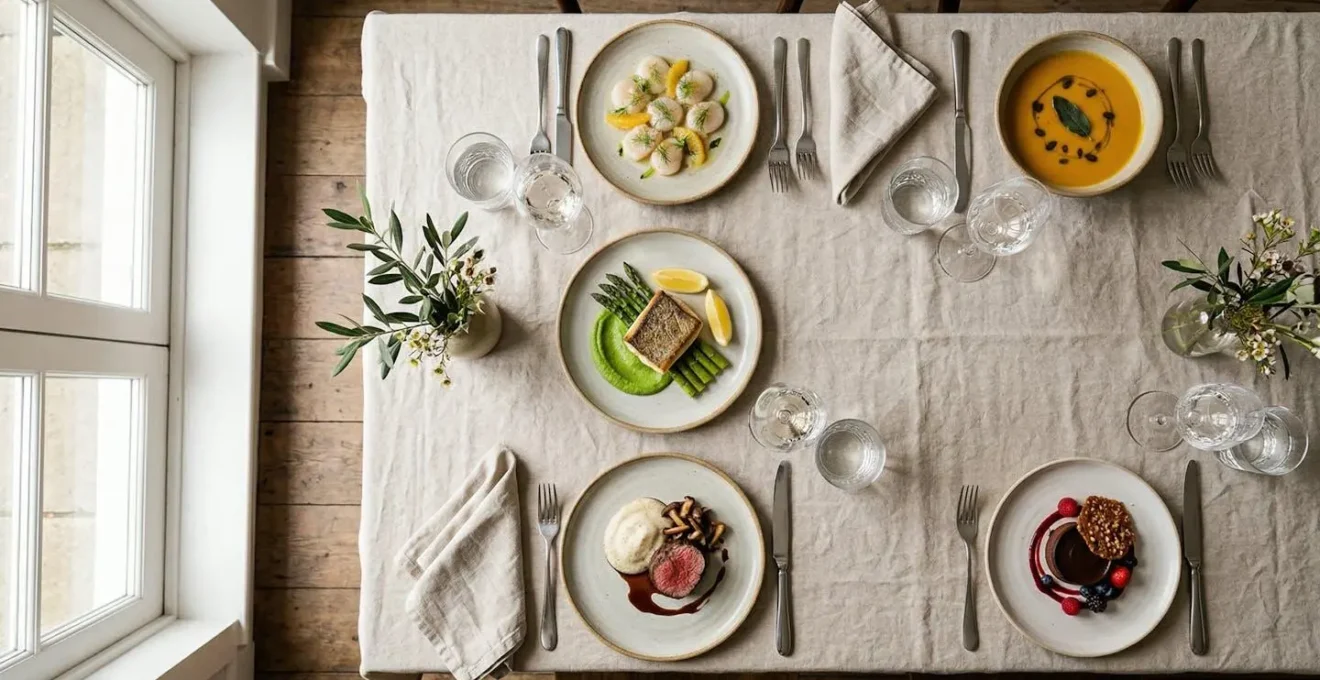
This strategy is particularly effective for seafood starters like ceviche, crudo, or a delicate fish tartare, which benefit from being served thoroughly chilled. The visual appeal is also a major factor. A carefully arranged cold plate can look stunning.
This is what professional preparation looks like. It is a composed, elegant start to the meal that sets a calm, controlled tone for the entire evening.
As you can see, the meticulous arrangement, the glisten of fresh ingredients, and the clean lines are all achievable when you are not rushing. This level of presentation is a direct result of preparing the dish in a calm, controlled manner hours before your guests even arrive.
By front-loading your effort, you are not just making food; you are manufacturing time and eliminating stress for your future self.
In What Exact Sequence Should You Prep 5 Dishes Using a Single Domestic Oven?
This is the ultimate logistical challenge for the home chef: the single oven bottleneck. A professional kitchen has multiple ovens, holding bays, and a team. You have one oven and two hands. Trying to cook five courses sequentially on the day is an unwinnable battle against time and temperature. The secret is to stop thinking of your oven as your primary cooking tool and start seeing it as a finishing station.
The game-changing technique, used by almost every high-end restaurant, is sous vide. This method of cooking food in a vacuum-sealed bag in a precisely controlled water bath allows you to cook proteins, vegetables, and even purées to their exact target temperature hours or even days in advance. The food can then be held in that water bath for extended periods without overcooking. Your oven is now freed up for the things it does best: roasting, baking, or high-heat finishing. Your sous vide becomes your primary holding unit.
Your timeline is no longer a linear race but a staggered, multi-day process. A perfectly cooked duck breast for your main course can be started the morning of the party and held in its water bath for hours. When it’s time to serve, you simply take it out of the bag, pat it dry, and sear the skin in a hot pan for two minutes. That’s it. Perfect results, zero last-minute stress.
Your 5-Point Oven Choreography Plan
- Points of contact: List all five courses and identify every component that requires heat. Differentiate between “cooking” and “finishing.”
- Collecte: Inventory your existing equipment. A sous vide circulator is your most powerful tool for freeing up the oven. Can you borrow a second one?
- Coherence: Confront your menu with your oven’s capabilities. A menu with braised short ribs (sous vide), a roasted vegetable (oven), and a seared fish (stovetop) is manageable. Three oven-roasted dishes are not.
- Mémorabilité/émotion: Where is the “wow” moment? Focus your oven time there. Use sous vide and cold preps for the other courses to protect that critical moment from logistical failure.
- Plan d’intégration: Create a work-back schedule starting two days before the party. Day 1: Season and bag proteins. Day 2 (Morning): Start long sous vide cooks. Day 2 (Afternoon): Prep and plate cold courses. Day 2 (Service): Use the oven ONLY for finishing or baking one key element.
By leveraging techniques like sous vide, you are not cheating; you are adopting the same intelligent workflow that allows a professional kitchen to serve hundreds of perfect dishes every night.
Which Elevates Complex Seafood Starters Better Between Wine Pairings and Botanical Mocktails?
Once you’ve perfected the food, the next level of hosting is the pairing. For a complex seafood starter—think scallops with a brown butter vinaigrette or a delicate sea bass crudo with citrus and chili—the right beverage can elevate the dish from great to unforgettable. The traditional choice is wine, but the modern, sophisticated host must also master the art of the non-alcoholic pairing. The question is not which is “better,” but which best serves the dish and the guest.
The principle of pairing with seafood is often driven by acidity. A crisp, dry white wine like a Sauvignon Blanc or an Albariño has a zesty acidity that cuts through the richness of the fish, cleansing the palate and highlighting the delicate flavours. The wine acts as a spotlight, making the seafood taste more of itself. The fatal error is to pair with a heavy, oaked Chardonnay or a tannic red, which would trample the dish’s subtleties.
However, the same principles can be applied to create stunning botanical mocktails. The key is to move beyond sugary juices and build a drink with complexity and structure. A base of sparkling water or high-quality tonic provides effervescence. Acidity can come from fresh lemon, lime, or even yuzu juice. Complexity and herbal notes can be introduced through muddled herbs like basil or mint, or infusions of botanicals like juniper, cardamom, or lemongrass. A well-crafted mocktail with sharp acidity and herbal notes can perform the exact same function as a glass of wine, offering a refreshing and inclusive option for all your guests.
Ultimately, the most elevated choice is to offer both. A thoughtful wine pairing and an equally thoughtful botanical mocktail demonstrates a level of care and expertise that defines truly high-end hospitality.
How to Use Agar-Agar Successfully to Create Stable Fruit Caviars at Home
One of the most visually impressive but surprisingly simple techniques from modern cuisine is spherification, specifically creating “fruit caviars.” These tiny, glistening pearls of flavour can transform a simple dessert or appetizer. While restaurant chefs often use complex chemicals, the ambitious home cook can achieve a near-identical, stable result with one key ingredient: agar-agar. This seaweed-derived gelling agent is the secret to creating perfect, shelf-stable pearls without the fuss of sodium alginate and calcium baths.
The process is a simple matter of chemistry and temperature shock. The key is a precise ratio and a strict sequence of steps. Here is the no-fail professional method:
- Prepare the Cold Oil Bath: This is the most crucial step. At least one hour before you begin, place a tall glass of neutral vegetable oil (like sunflower or canola) in the freezer. The oil must be ice-cold for the spheres to form correctly.
- Create the Agar Base: Choose your liquid—a smooth fruit purée or juice works best. The ratio is paramount: use approximately 2 grams of agar-agar powder for every 1 cup (250ml) of liquid. Whisk the agar-agar into the cold liquid until fully dissolved. This prevents clumping.
- Activate the Agar: Pour the mixture into a small saucepan and bring it to a full, rolling boil over medium heat, stirring constantly. You MUST boil it for at least two minutes to fully activate the agar’s gelling properties. This is a non-negotiable step.
- Form the Caviar: Let the mixture cool for a few minutes until it’s no longer steaming hot but is still liquid (around 130°F/55°C). Use a syringe or a squeeze bottle to drip the mixture, one drop at a time, into the cold oil. The thermal shock will cause each drop to instantly gel into a perfect sphere as it sinks to the bottom.
- Harvest and Store: Once finished, pour the oil and caviar through a fine-mesh sieve. Gently rinse the caviar with cold water to remove any excess oil. The pearls are now ready to use and can be stored in the refrigerator in a sealed container for several days.
This technique allows you to add a burst of flavour and a touch of culinary magic to dishes like panna cotta, oysters, or even cocktails, demonstrating a command of texture that elevates your meal.
Mastering this single technique can provide a high-impact visual and textural element that makes an affordable dish look and feel like a million pounds.
How to Master the Negative Space Technique for Affordable Meat Cuts
How do you make a £5 cut of flank steak look as luxurious as a £30 fillet? The answer lies not in a complex sauce, but in a powerful design principle: negative space. In plating, negative space is the empty area of the plate that is left deliberately clear. This technique, borrowed from visual art and design, is a chef’s most effective tool for creating focus, elegance, and a perception of high value, especially when working with humble ingredients.
An amateur cook’s instinct is to fill the plate, believing more food equals more value. A professional understands that the opposite is true. By using an oversized plate and arranging the components artfully on one section, you create a “frame” of empty space. This frame draws the eye directly to the food, making it appear more special, more deliberate, and more important. The technique forces the diner to slow down and appreciate the details of the dish you’ve presented.
This is what a perfectly executed use of negative space with an affordable cut of meat looks like. The meat is the hero, framed by the clean white space of the plate.
Notice how thinly slicing an affordable cut like flank or bavette steak and fanning it out creates an illusion of quantity and elegance. The placement is off-centre, adhering to the “rule of thirds,” which is more dynamic and pleasing to the eye than a central composition. A single, bold stroke of a colourful purée adds contrast and directs the gaze, but the true star is the empty space that gives the protein room to breathe.
Oversized plates act as a canvas, providing negative space that frames the items, provides focus, and brings out the colors and characteristics of the food. The size of the plate affects the perception of quantity and portion size because the larger the plate, the smaller the portion appears to the guest.
– The Culinary Pro, Plate Presentations Guide
By mastering negative space, you are not just plating food; you are composing a piece of art. You are controlling the diner’s perception, making simple food feel sophisticated and small portions feel intentionally precious.
Key takeaways
- A successful tasting menu is a system based on a “sensory arc,” not a random collection of recipes.
- Rigorous portion control is not stinginess; it’s a tool to ensure guests enjoy all five courses.
- The key to a stress-free timeline is to remove variables: pre-plate cold courses and use tools like sous vide to bypass the oven bottleneck.
How to Elevate Budget Meals Using High-End Visual Culinary Presentation at Home
We eat with our eyes first. This is not a cliché; it is a scientific fact. The perceived value, and even the perceived taste, of a dish is profoundly influenced by its presentation. For the ambitious home cook on a budget, this is the single most powerful secret weapon. You can take humble, inexpensive ingredients and, through the application of professional plating techniques, make them feel luxurious and sophisticated. Mastering visual presentation is the final, crucial layer of the chef’s system.
The impact is measurable. In fact, scientific studies confirm that attractive plate designs have a significant, positive effect on how tasty people perceive their food to be. A simple chicken thigh, when deboned, crisped, and artfully plated with a sauce “swoosh” and micro-garnish, is no longer just a chicken thigh. It is an experience. This transformation doesn’t require expensive ingredients, but it does require the right tools and techniques.
You don’t need to invest a fortune. A small, strategic investment in a few key plating tools can dramatically elevate your presentation game.
- Squeeze Bottles (under £15): The most essential tool. Perfect for creating precise dots, lines, and swirls with sauces, purées, and infused oils.
- Decorating Brushes (under £20): A set of new, food-safe brushes allows you to “paint” thick sauces onto the plate with an artistic, textured stroke.
- Plating Tweezers: For placing delicate herbs, flowers, or small components with a precision that fingers can never achieve.
- Ring Molds: Essential for taming messy ingredients like grains or chopped vegetables into a tight, clean, professional-looking circle, creating height and structure.
These tools, combined with the principles of colour contrast (e.g., a vibrant green herb oil against a white purée) and negative space, are what separate amateur plating from professional composition.
Start treating every plate as a blank canvas. By applying these visual techniques, you are communicating care, intention, and skill—transforming a simple budget meal into a high-end dining statement.