In summary:
- Successful fermentation relies on understanding principles, not owning expensive crocks.
- The right salt and correct brine concentration are crucial for texture and safety.
- Stable temperature is more important than perfect temperature; learn to create warm micro-climates.
- Keeping vegetables fully submerged is non-negotiable, but can be done with simple household items.
- Observing your ferment—smell, bubbles, and taste—is the key to developing fermentation intuition.
There’s a deep satisfaction in transforming a simple cabbage or a handful of carrots into a vibrant, probiotic-rich food with nothing but salt, water, and time. Yet, for many home fermenters, the journey is fraught with anxiety. We’ve all heard the stories or seen the disappointing results: mushy sauerkraut, a jar of pickles turned to sludge, or the dreaded appearance of fuzzy green mould that sends the whole batch to the bin. This fear often pushes people toward expensive, specialized crocks and airlocks, believing that gear is the only path to success.
The common advice revolves around sterile environments and precise equipment, but the truth of traditional fermentation is far more resilient. For generations, our ancestors fermented successfully in simple pots and jars, in kitchens far from climate-controlled. They didn’t have digital scales or heating mats; they had an intuitive understanding of a living process. They knew how to work *with* the microbial ecosystem, not just follow a rigid recipe. This is the real secret that often gets lost.
What if the key wasn’t a £100 crock, but knowing how to create a safe, self-regulating environment in a basic glass jar? This guide abandons the obsession with gear and returns to first principles. We will explore how to master the foundational pillars of fermentation—the correct salt, the perfect brine, strategic temperature management, and effective submersion—using what you already have. By learning to read and guide the life in your jar, you can ferment with confidence, even in a less-than-perfect kitchen.
This article will walk you through the core techniques that separate revivalist fermenters from beginners. We’ll demystify the process, giving you the knowledge to create safe, delicious, and gut-healing foods consistently.
Summary: The Revivalist’s Guide to Safe Lacto-Fermentation Without Fancy Equipment
- Why Table Salt Ruins Cabbage Fermentation and Encourages Dangerous Moulds?
- How to Calibrate the Perfect Brine Ratio for Crunchy Autumn Carrots
- The Temperature Fluctuation Error That Turns Sauerkraut Into Mush
- When to Move Active Kimchi From the Countertop to the Fridge
- Which Keeps Vegetables Safely Submerged Cheaper Between Glass Weights and Cabbage Leaves?
- Which Provides Longer-Lasting Satiety for Sedentary Workers Between Raw Almonds and Chia Seeds?
- How to Create a Warm Micro-Climate in a Drafty Kitchen for Consistent Fermentation
- How to Rescue and Maintain an Active Sourdough Culture During Cold British Winters
Why Table Salt Ruins Cabbage Fermentation and Encourages Dangerous Moulds?
In the world of fermentation, not all salt is created equal. The common wisdom you’ll hear in every fermenting circle is to avoid standard iodized table salt at all costs. The reasoning is that the iodine added to prevent goiters acts as an antimicrobial agent, hindering the beneficial bacteria we want to cultivate. As the experts at Cultures for Health state in their guide on choosing salt:
Iodine tends to inhibit the beneficial bacteria in a cultured vegetable, so we do not recommend using iodized salt for vegetable fermentation.
– Cultures for Health, Choosing Salt For Fermenting Vegetables guide
However, the story is slightly more nuanced. While it’s still best practice to avoid it, some research suggests the iodine itself may not be the primary villain. A 2018 study on sauerkraut fermentation found that the use of iodized salt did not statistically significantly influence microbial populations. The more likely culprits are the anti-caking agents (like sodium ferrocyanide or calcium silicate) added to table salt to keep it free-flowing. These additives can create cloudy brines and, more importantly, interfere with the delicate work of our lactic acid bacteria.
The goal of salt in fermentation is twofold: to draw water out of the vegetables to create its own brine, and to create an environment where beneficial, salt-tolerant Lactobacillus bacteria can thrive while harmful pathogens cannot. Using a pure, unrefined salt—like sea salt or Himalayan pink salt—ensures you are providing a clean environment for this microbial ecosystem to establish itself. These salts contain no additives and often provide trace minerals that can support the fermentation process. By choosing the right salt, you are setting the stage for a safe, successful ferment free from unwanted mould and off-flavours.
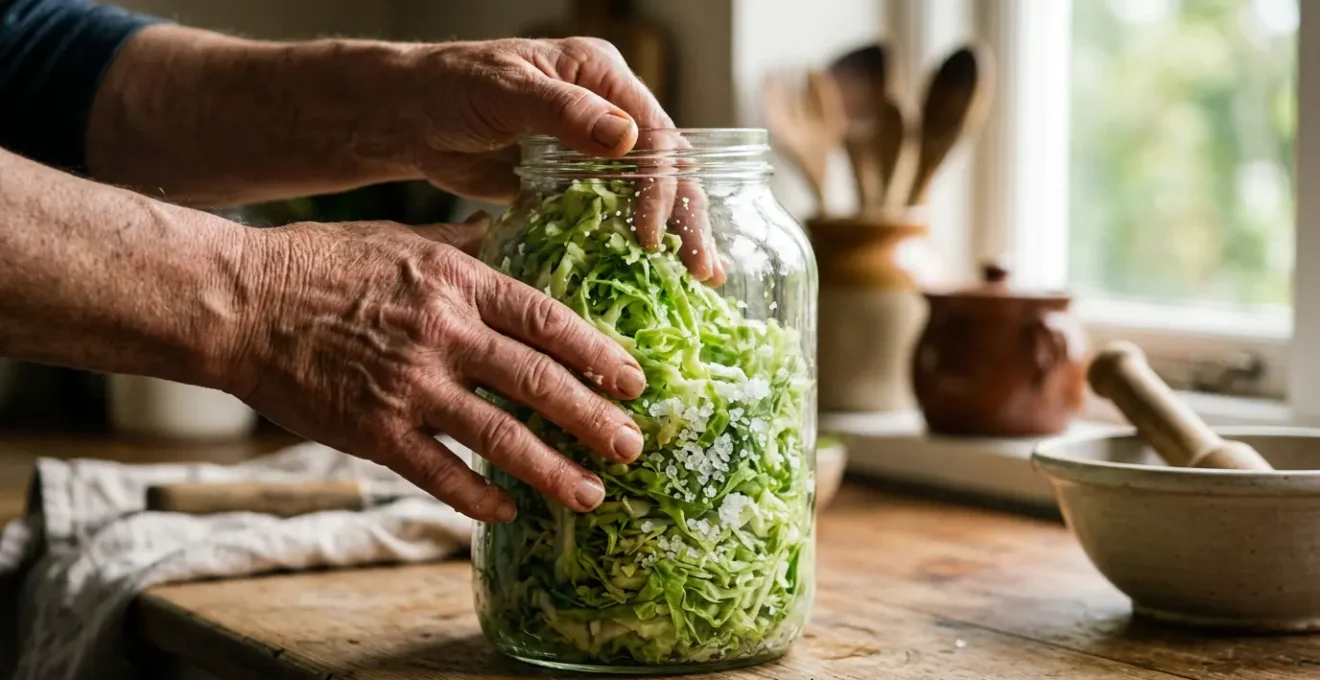
How to Calibrate the Perfect Brine Ratio for Crunchy Autumn Carrots
Once you’ve chosen the right salt, the next critical step is using the right amount. The salt concentration of your brine is the primary control you have over the texture of your final product. Too little salt, and you risk mushy vegetables and the growth of spoilage microbes. Too much, and you’ll inhibit the beneficial bacteria, slowing or stalling your ferment entirely. For crisp vegetables like carrots, beets, or green beans, a brine of 2% to 2.5% salinity by weight is the sweet spot. This concentration is enough to keep the vegetables’ pectin firm, resulting in that satisfying crunch.
Forget imprecise volume measurements like tablespoons per quart. The traditional, and most accurate, way to achieve the perfect brine is to weigh everything. This method accounts for the varying density of different vegetables and ensures your ratio is spot-on every time. It’s the secret to consistent, repeatable results.
Here is the simple, time-honoured process for calculating your brine by weight:
- Weigh your empty jar and write down the weight (or tare the scale).
- Fill the jar with your prepared vegetables and then add water until they are covered.
- Weigh the filled jar and subtract the empty jar’s weight to get the total weight of vegetables and water.
- Calculate 2.2% of this total weight. For example, if your vegetables and water weigh 1000g, you will need 22g of salt.
- Weigh out that exact amount of pure, non-iodized salt using a digital scale.
- Add the salt to your jar, seal it, and shake gently to dissolve.
This methodical approach ensures that your carrots will remain beautifully crisp and vibrant, protected by a perfectly calibrated anaerobic fortress. The brine not only preserves texture but also pulls out the vegetable’s natural sugars, providing the ideal first meal for the lactic acid bacteria to begin their work.
As you can see, a correctly formulated brine keeps the vegetables looking as good as they taste. This control over texture is a hallmark of moving from a novice to an intuitive fermenter, understanding how a simple salt solution can produce such a dramatic difference in quality. This is the foundation of creating ferments with exceptional mouthfeel.
The Temperature Fluctuation Error That Turns Sauerkraut Into Mush
You’ve used the right salt and the perfect brine, yet your sauerkraut still turns out soft and unappealing. The most likely culprit is temperature. Fermentation is a living process driven by a succession of different microbes, and each type has its preferred temperature range. Wild fluctuations or excessively warm conditions can throw this delicate succession off balance, leading to poor texture and flavour.
Initially, a bacteria strain called Leuconostoc mesenteroides does the early work. It thrives in cooler temperatures (around 65-72°F or 18-22°C) and produces carbon dioxide (the bubbles you see) and lactic acid, creating the acidic environment needed for the next stage. If the temperature is too high from the start, you skip past this crucial first step. More heat-tolerant but less desirable bacteria that break down pectin—the natural substance that keeps vegetables crisp—can take over. This is what leads to a mushy, soft texture.
Case Study: The Impact of High Temperatures
Fermentation experts observe that when temperatures consistently exceed 70°F (21°C), the process accelerates dramatically. Bacteria that actively feed on pectin become dominant, causing the structural breakdown of vegetables. This results not only in a softer, mushier texture but also a sharper, less complex flavour profile. Furthermore, in warmer conditions, water evaporation from the brine is higher, potentially exposing vegetables to air and increasing the risk of spoilage. These fast, hot ferments often have a shorter shelf life even when moved to cold storage.
Scientific studies confirm this principle of microbial succession. While not on sauerkraut specifically, research on silage fermentation revealed that entirely different species of lactic acid bacteria were dominant at cooler temperatures (5-10°C) compared to warmer ones (20-25°C). This demonstrates that temperature is a primary driver in determining which microbes lead the fermentation, directly impacting the final outcome. The goal is not necessarily a *cold* ferment, but a stable and consistent temperature, especially in the first few days. This allows the right sequence of bacteria to work their magic, ensuring a crunchy, complex, and delicious sauerkraut.
When to Move Active Kimchi From the Countertop to the Fridge
Kimchi is a dynamic and lively ferment, and knowing when to move it from the counter to the cold of the refrigerator is key to controlling its flavour and texture. Unlike sauerkraut, which often undergoes a long, slow ferment, kimchi’s initial countertop phase is a short, explosive burst of activity. During this time, the primary goal is to let the lactic acid bacteria multiply rapidly and drop the pH to a safe, acidic level that preserves the vegetables.
The speed of this process is almost entirely dependent on ambient temperature. Official food safety guidelines provide a clear timeline: according to British Columbia fermentation guidelines, the pH drops to a safe 4.6 or lower in approximately 2 days at a room temperature of 20°C (68°F), but it could take 6 days at 10°C (50°F). For most kitchens, this means your kimchi will be ready for the fridge after 1 to 3 days on the counter. You’ll know it’s active when you see bubbles forming, smell a tangy, sour aroma (not a rotten one), and perhaps see the brine level rise.
Once you move the kimchi to the fridge, fermentation doesn’t stop; it slows down dramatically. This is where the magic of flavour development happens. The cold allows complex, umami notes to develop over weeks and even months. The timing of this move is a matter of personal preference, allowing you to guide the final taste of your kimchi. The table below, based on traditional timelines, provides a guide to how your kimchi will evolve in the fridge.
| Refrigeration Day | Flavor Profile | Texture | Best Use |
|---|---|---|---|
| Day 1-2 (Room Temp) | Mild, salty, fresh cabbage aroma | Very crisp and firm | Fresh kimchi for immediate eating |
| Day 3-4 | Fresh, crisp, effervescent with light tang | Crisp with slight softening | Banchan side dish, salads |
| Day 7 | Deeper tang, complex aroma, balanced acidity | Pleasant bite, moderately soft | Traditional kimchi serving, fried rice |
| Day 10+ | Rich, soft, umami-heavy, stew-ready | Soft, well-fermented | Kimchi jjigae (stew), pancakes |
By tasting your kimchi at each stage, you develop an fermentation intuition. You learn to recognize the flavour profile you prefer and can pull jars from the fridge accordingly. Some you might enjoy young and crisp as a side dish, while others you let age into a deeply funky condiment perfect for cooking.
Which Keeps Vegetables Safely Submerged Cheaper Between Glass Weights and Cabbage Leaves?
The single most important rule in lacto-fermentation is to keep your vegetables submerged beneath the brine. The process must be anaerobic (without oxygen) for lactic acid bacteria to thrive. Exposure to air is an open invitation for mould and undesirable yeasts. While expensive glass or ceramic fermentation weights are often marketed as essential, traditional methods offer effective, low-cost alternatives.
Glass and ceramic weights are indeed an excellent option. They are non-reactive, easy to clean, and reusable, making them a reliable one-time investment. They eliminate any risk of mould that might grow on an organic weight and provide a clean, hygienic barrier. For those committed to regular fermentation, they are a worthwhile tool. However, they are far from necessary for getting started.
For centuries, fermenters have used what they have on hand. One of the most common traditional methods is to use a large, clean outer leaf from the cabbage itself, folded and tucked into the jar to hold the shredded cabbage down. A slice of carrot or other firm vegetable can be wedged into the shoulder of the jar to keep the leaf in place. This works well but requires careful packing to avoid air pockets.
However, for the modern revivalist fermenting in a simple wide-mouth glass jar, there is an even cheaper and more effective solution: the brine-filled ziplock bag. Simply take a clean, small ziplock bag, place it on top of your vegetables inside the jar, and fill it with a bit of the same-strength brine you used for your ferment. Seal the bag and press it down. The liquid-filled bag is heavy and flexible, conforming perfectly to the surface and creating a complete seal that prevents any oxygen from reaching your ferment. It acts as both a weight and a partial airlock, and it costs next to nothing.
While a cabbage leaf is the traditional method, the ziplock bag is a modern, foolproof adaptation that honors the spirit of using simple, effective tools. It proves that you don’t need to spend a fortune to create the perfect anaerobic fortress for your ferment. The goal is submersion, and the method you choose can be as simple or as sophisticated as you like, as long as it works.
Which Provides Longer-Lasting Satiety for Sedentary Workers Between Raw Almonds and Chia Seeds?
While we perfect the art of cultivating our inner garden with fermented foods, it’s equally important to consider what other foods we use to tend to it. For many of us, especially those with sedentary jobs, maintaining energy and avoiding the 4 PM slump is a constant battle. The foods we pair with our gut-healthy ferments can make a significant difference. When it comes to powerhouse snacks, both raw almonds and chia seeds are excellent choices, but they offer satiety in different ways.
Raw almonds provide lasting energy through a combination of healthy fats, protein, and fiber. The act of chewing them begins the digestive process and sends signals of fullness to the brain. Their fat and protein content is digested slowly, leading to a stable blood sugar level and a prolonged feeling of satiety. This makes a small handful of almonds an excellent choice for preventing energy crashes and mindless snacking between meals.
Chia seeds, on the other hand, work their magic through hydration and soluble fiber. When consumed, particularly after being soaked, they absorb liquid and expand in the stomach, forming a gel-like substance. This physical volume creates a powerful sense of fullness. The soluble fiber in chia is also a fantastic prebiotic—it’s the food that feeds the beneficial probiotic bacteria you’re cultivating with your ferments. A spoonful of chia seeds in a glass of water or mixed into yogurt can provide impressive, long-lasting satiety with very few calories.
So, which is better? For immediate, chewable satisfaction and a slow-burn energy release, almonds are superior. For a low-calorie, high-fiber option that creates a feeling of fullness through volume and supports your microbial ecosystem, chia seeds are the winner. The best approach for a sedentary worker is to use them strategically: almonds for a mid-afternoon energy boost, and a chia pudding prepared with a splash of water kefir for a filling, gut-friendly start to the day.
How to Create a Warm Micro-Climate in a Drafty Kitchen for Consistent Fermentation
One of the biggest challenges for a fermenter, especially in a place with cold winters like the UK, is maintaining a consistent temperature. As we’ve learned, wild swings can ruin texture and flavour. The ideal range for most lactic acid fermentation is a cozy 20-30°C (68-86°F), as confirmed by research on lactic acid fermentation showing an optimum temperature for microbial activity in this range. But what do you do in a drafty, damp kitchen where the ambient temperature is much lower?
The answer is not to heat your whole house, but to become a master of environmental control on a micro scale. Your kitchen is full of small, stable warm spots if you know where to look. You don’t need expensive heating mats or proofing boxes; you just need a little observation and creativity to build a fermentation haven. The goal is to find or create a small, insulated space that shields your jars from the fluctuating air temperature of the room.
This is about working with the energy you already have. Appliances give off small amounts of waste heat, and simple insulation can trap it to create the perfect environment. By building this fermentation intuition, you can ensure your ferments get the consistent, gentle warmth they need to thrive, no matter how chilly it is outside.
Your Action Plan: Creating a Stable Fermentation Haven
- Map your kitchen: Use a cheap thermometer to identify naturally stable warm spots, such as in cupboards away from exterior walls or on high shelves.
- Use thermal mass: Wrap your fermentation jars in thick towels or blankets to insulate them and slow down any temperature changes from day to night.
- Utilize appliance heat: Place jars on top of the refrigerator, where waste heat from the coils often creates a consistent 70-75°F (21-24°C) zone.
- Try the oven light trick: With the oven OFF, simply turn on the interior light. The small bulb will often generate enough heat to create a perfect 75-80°F (24-27°C) proofing box.
- Build a cooler chamber: Place your jars inside an insulated picnic cooler. You can add a jar of warm water alongside them to gently raise the temperature inside the sealed environment.
By implementing these no-cost strategies, you take control of one of the most critical variables in fermentation. You are no longer at the mercy of the weather, but are actively guiding your microbial ecosystem towards a successful outcome.
Key Takeaways
- Fermentation safety rests on three pillars: correct salt brine, complete submersion (anaerobic environment), and stable temperature.
- You don’t need expensive gear. Simple glass jars, pure salt, and creative, no-cost solutions for weights and warmth are all you need.
- Observe your ferments daily. The sight of bubbles, a tangy smell, and a cloudy brine are signs of a healthy, active fermentation.
How to Rescue and Maintain an Active Sourdough Culture During Cold British Winters
While our focus has been on lacto-fermentation of vegetables, the principles of environmental control are universal and apply equally to other types of ferments, like a sourdough starter. A sourdough culture is a symbiotic culture of yeast and bacteria (a SCOBY), but it is often yeast-dominant. During cold British winters, it’s common for a starter to become sluggish and sleepy, its rising power diminished by the chilly ambient temperature.
Rescuing a sluggish starter follows the same logic as creating a warm spot for kimchi. Your starter needs warmth to thrive. If it’s barely bubbling, the first step is to move it to a warmer location using the very same techniques we just discussed: the top of the fridge, inside the oven with only the light on, or wrapped in a towel near a router. This gentle, consistent warmth will encourage the wild yeasts to become more active.
The next step is a series of revitalizing feedings. Instead of your normal schedule, give it smaller, more frequent feedings for a day or two. Discard all but a tablespoon of the starter and feed it with 25g of flour and 25g of warm (not hot!) water. This high ratio of fresh food to old starter, combined with the warmer temperature, will give the yeast population a powerful boost. Within a couple of cycles, you should see a return to the vigorous bubbling and predictable rise you see in summer. Maintaining it through the winter is simply a matter of keeping it in that stable, warm micro-climate you’ve created.
Whether you’re fermenting cabbage or cultivating a sourdough starter, you are the guardian of a microbial ecosystem. Your role is to provide the right food, the right level of safety (salt or acidity), and, most importantly, the right environment. Understanding these foundational principles allows you to troubleshoot any ferment with confidence.
Now that you understand the core principles, the best way to build your intuition is to begin. Start with a small jar of salted cabbage and watch it transform, knowing you have the knowledge to guide it safely to deliciousness.
Frequently Asked Questions about Fermentation Safety
How do I know if my ferment is still safe to eat?
A healthy ferment will show signs of life. Look for bubbling and gas formation, which indicate that the Lactic Acid Bacteria (LAB) are producing carbon dioxide. The brine may become cloudy, and a pleasant tangy or sour aroma is a good sign. The most reliable indicator of safety is a drop in pH; once it reaches 4.6 or below, the environment is hostile to most pathogens.
What is Kahm yeast and is it dangerous?
Kahm yeast is not mould and is generally harmless. It appears as a flat, white, often wrinkly or geometric-looking film on the surface of the brine. It is an aerobic yeast, meaning it grows due to oxygen exposure. While it can impart an off-flavour, you can simply skim it off the surface. If the ferment underneath still smells tangy and good, it’s likely safe to consume.
When should I discard my ferment?
Trust your senses. You must discard your ferment if you see any signs of fuzzy, hairy, or colourful patches (black, green, pink, or orange), as this is mould. A putrid, rotten, or “off” smell that is distinct from a normal tangy fermented aroma is another major red flag. Finally, if the vegetables have developed an unusual slimy or sticky texture, the fermentation has been compromised and should not be consumed.
Can I use pH test strips at home?
Yes, using commercial pH test strips is an easy and affordable way to gain peace of mind. Dip a clean strip into the brine and compare the color to the chart. You are looking for a reading of 4.6 or lower, which indicates the ferment is sufficiently acidic to be considered safe from pathogens like C. botulinum. A DIY indicator can even be made with red cabbage juice, which turns bright pink in acidic conditions.